The original post was so big that I split it up into two parts.
A standard feature of real-time strategy- and tactical games is what’s called a “fog of war”. The term comes from traditional warfare and it tries to describe the situational awareness experienced by participants in military operations (from Wikipedia).
What that means in game terms is that the fog of war covers everything that’s not within sight range of units or buildings. The entire map is covered in darkness and the units and buildings have a ‘sight circle’ that reveals the map immediately around them. As the units traverse the level they reveal more of the terrain. This feature is probably best known in the WarCraft series of games. Here is an example from WarCraft II:
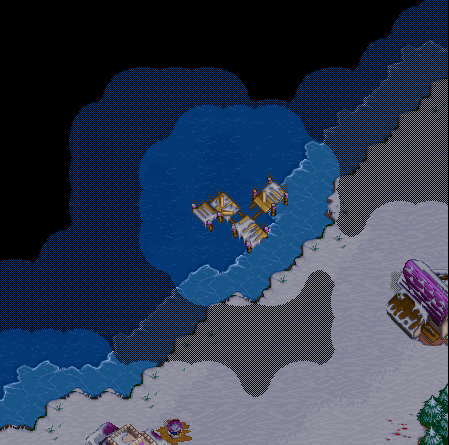
The black areas haven’t been explored yet, while the shaded areas have been explored but aren’t currently within sight. You can also see in this example that if sight circles touch, the fringe of the fog merges into a nice organic shape.
If you have ever wanted to implement such a feature in your game, I’ll show you how. It’s a lot easier than you might think. What’s great about this feature is that it’s not limited to using only in strategy games. You can use it in RPGs and even puzzle games, too!
Note 1: this article will describe how to implement a 2D fog of war, but the technique is the same as for 3D as it is for 2D.
Note 2: when the article says ‘circle’ I really mean ‘sight shape’. The system would work the same if you wanted a square site shape.
Mmm, Tasty!
Generally speaking, there are two kinds of fog of war you can implement. Both require slightly different approaches to their implementation, and I like to think of them in terms I can easily relate to: peanut butter.
You see, like peanut butter, fog of war comes in two types: chunky and smooth. (For those of you not familiar with peanut butter – you’re definitely missing out – chunky peanut butter has bits of peanuts mixed in with the peanut butter, and smooth doesn’t.) Both types have the usual trade-offs to consider, aesthetics vs. resources, so you need to consider everything before making your choice.
Chunky Fog
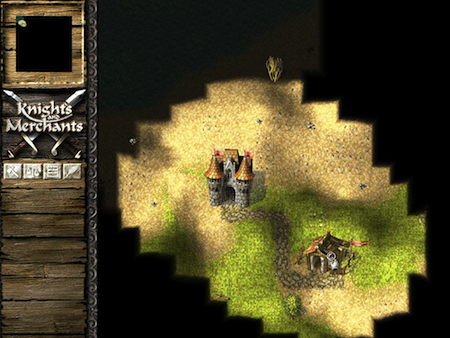
Part 1 of the series will focus on chunky fog. It is the easiest to implement and requires the least amount of resources. That ease of implementation comes with a price though: it looks chunky. There are many games that use chunky fog and here is an example of what it looks like when applied to a 3D terrain.
Map Tiles
Fog of war systems are normally used in games that use a map to represent the level the units are traversing. For example, in the WarCraft II illustration above, you can see that there are water tiles, ground tiles and trees. This map is usually an array of tile data (structures) that store information specific to that tile: the type of tile it is (water, grass, etc.), if a unit can walk on it (grass would be true, a tree would be false, for example), and so on.
Fog systems are the same way. They use the notion of tiles to represent how the fog looks and therefore go hand-in-hand with the normal tile map. This means that the size of the fog tile is usually the same size as the terrain tile. Therefore, you can take advantage of this idea and store the fog-specific information along with the normal tile data. If you want to keep the fog data separate from the normal data, you can certainly do that. You would just need to have another fog-specific map.
Step 1: Store Your Flags
Chunky fog is a binary system: a tile is either revealed or not. All you need to do is store at least 2 bits per tile in your level map. (Why you need 2 bits instead of 1 will be explained in the next step.)
When it’s time to initialize the fog map, say after a level load, you need to set every entry to ‘black’. That is to say, it hasn’t be revealed yet. Black could be any non-zero value you choose. Zero would represent ‘revealed’. Since there are 2 bits to choose from, I chose black to have a value of 3 (both bits set).
Step 2: ‘Draw’ The Circle
The next step is to apply the circle to the fog map.
Find yourself a decent algorithm to create the circle. I wanted a fast circle algorithm that supported any radius so I chose the last one on this page. That pseudo code is shown below:
void circlePoints(int cx, int cy, int x, int y, int pix)
{
    if (0 == x)
    {
        setPixel(pix, cx, cy + y);
        setPixel(pix, cx, cy - y);
        setPixel(pix, cx + y, cy);
        setPixel(pix, cx - y, cy);
    }
    else
    if (x == y)
    {
        setPixel(pix, cx + x, cy + y);
        setPixel(pix, cx - x, cy + y);
        setPixel(pix, cx + x, cy - y);
        setPixel(pix, cx - x, cy - y);
    }
    else
    if (x < y)
    {
        setPixel(pix, cx + x, cy + y);
        setPixel(pix, cx - x, cy + y);
        setPixel(pix, cx + x, cy - y);
        setPixel(pix, cx - x, cy - y);
        setPixel(pix, cx + y, cy + x);
        setPixel(pix, cx - y, cy + x);
        setPixel(pix, cx + y, cy - x);
        setPixel(pix, cx - y, cy - x);
    }
}

void circleMidpoint(int xCenter, int yCenter, int radius, int color)
{
    int x = 0;
    int y = radius;
    int p = (5 - radius*4)/4;

    circlePoints(xCenter, yCenter, x, y, color);

    while (x < y)
    {
        x++;
        if (p < 0)
        {
            p += 2*x+1;
        }
        else
        {
            y--;
            p += 2*(x-y)+1;
        }

        circlePoints(xCenter, yCenter, x, y, color);
    }
}
I would search for an algorithm that uses 8-way symmetry. You could use an algorithm that a mathematician would choose (in that it would be super-accurate), but that uses math routines that severely slows down the algorithm. You want a fast solution because you could have a lot of units wanting to ‘see’.
Whichever solution you choose, you want to make sure that it lets you ‘draw’ the circle based on the center point (where the unit is) and a radius. You can assume a fixed radius of course but your game might be more playable if different kinds of units have different sight abilities; the design would obviously dictate this.
Where the algorithm draws a pixel, you would replace that with a value that represents “my circle edge is defined here”. Since black has a value of 3, I chose a value of 1 to represent an edge.
In other words, you’re not really drawing anything in the traditional sense: you’re doing a logical draw into the fog map. When you set the pixel, you don’t need to waste time to check if the tile is already revealed or not, just set the tile data with the circle edge value.
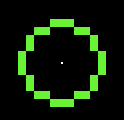
Here is an illustration showing the results of this step with a circle radius of 5 (the white dot shows the center point):
Note: Your setPixel() equivalent will need to handle when the pixel is off the map. (It should just return without doing any work.)
Step 3: ‘Fill’ The Circle
The next step is to fill the circle. What you need to do is change all of the circle edge pixels to cleared pixels. You do that with a scanline fill algorithm.
For every row of pixels there will always be a start- and end point. To fill the circle, you look at every row in the map that the circle touched. You can derive the upper-left corner because you know the center point and radius. Working from left to right, you find the starting pixel and clear each one until you find the ending pixel.

Note: One thing I need to mention here is that the only time you won’t have both a start- and an end point is along the left and right map boundaries. For example, if the center of the circle is on the leftmost map tile, the left half of the circle will be off the map; there won’t be any start points. Therefore, your circle fill routine needs to accommodate these circumstances.
Step 4: Draw The Fog
The last step is to actually draw the fog based on data in the map. For every tile that is on-screen, check to see if the ‘black’ data is set. If it is, draw your representation of fog. This could take a few forms and depends on your game’s visual style. For example, it could just be a black rectangle. Another could be applying black to the map tile’s vertices (as shown in the example above).
And that’s all there is to it! When you’re done, you’ll end up with something like this:

Next Week – Part 2!
Come back next week for Part 2. Things get really interesting when I describe how to implement a “Smooth” Fog of War!